I'm not sure if I told you, but there are three of us ladies in the neighbourhood all due within two weeks of each other. We're all friends too, but we didn't plan this. It's crazy!
I decided to make three baby quilts, one for each of us to commemorate this journey we've shared together.
One lady already gave birth on the first of this month (she's always early). I made her quilt top neutral since nobody knew what she was having. It ended up being a boy, which is great because I think this quilt suits a boy better anyway.
I used this pattern by Cluck Cluck Sew. So nice and quick. Great for a crazy pregnant lady making 3 baby quilts back to back!
Since I had some extra bits from the end of the block row, I decided to add them to the backing to break up the mundane of the white.
I quilted it in a spiral "straight" stitch pattern.
It's machine binded with some white bias tape.
I will share our girl version next time.
Monday, July 20, 2015
Monday, July 13, 2015
Memorabilia Drawstring Backpack
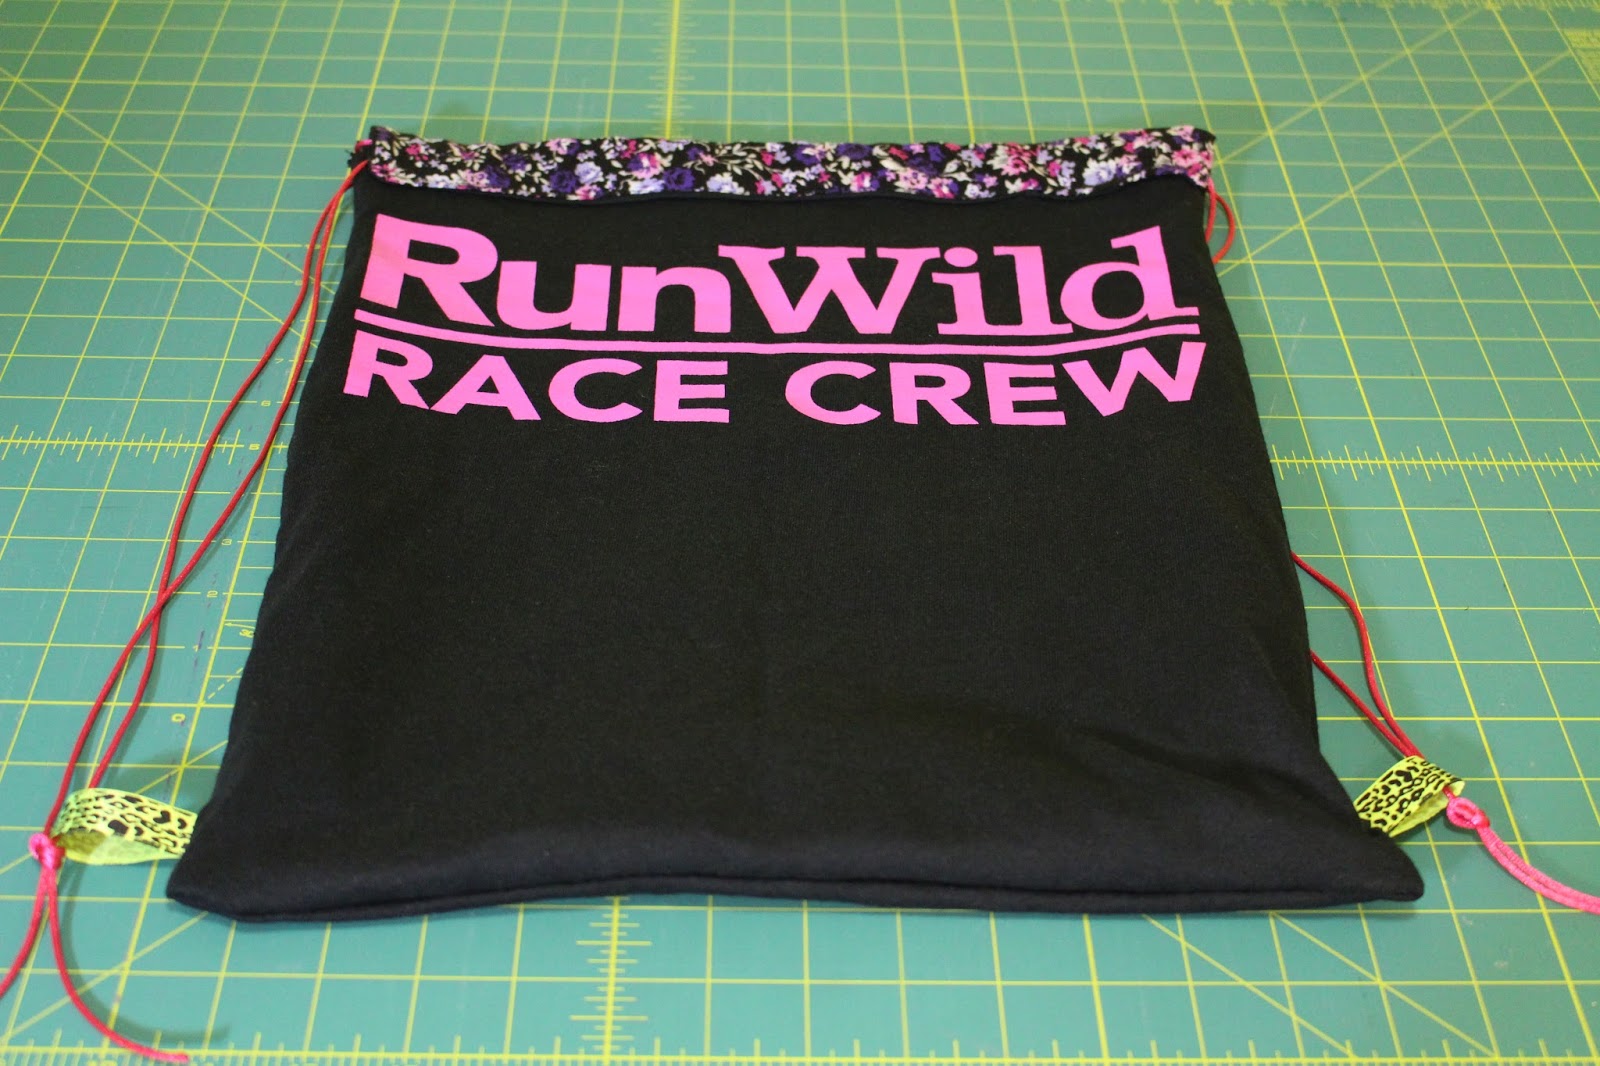
Back in May my daughter and I volunteered at a local race together. Since I couldn't run in it, I thought it would be nice to give back to the running community in this small way.
We each received a volunteer shirt. They were both size large. When we got home I questioned what to do with my daughters t-shirt.
My answer was "You make a drawstring bag from it". I used a pattern from Sewing to Sell.
This was made for my daughter who helped me that day. It's a nice way to commemorate the day that we spent together. And she has a functional bag to boot. I will probably make one out of my t-shirt to hold my gym shoes in.
We each received a volunteer shirt. They were both size large. When we got home I questioned what to do with my daughters t-shirt.
My answer was "You make a drawstring bag from it". I used a pattern from Sewing to Sell.
I gathered my materials and cut them to size. I forgot to take a picture of the t-shirt but as you can see it was large enough to get two 18" squares from both sides.
For the liner I used some material that I made a skirt from and then never wore because it looked awful. It was terrible for a skirt but fabulous for the liner of this bag.
And there you have it; the finished product.
This was made for my daughter who helped me that day. It's a nice way to commemorate the day that we spent together. And she has a functional bag to boot. I will probably make one out of my t-shirt to hold my gym shoes in.
Wednesday, July 8, 2015
Headbands
So there have been a lot of little girl birthdays around the neighbourhood lately. I turned to my quick and easy sewn headband pattern found on Happy Together's blog here. It's great. I've made at least 8 already. It's easier to make multiples actually. If I do an assembly line (like 4 at a time) they average about 15 min to make, each.
Here are just two of the ones I made.
And since they're reversible here's the other side:
A pretty cute and quick gift I'd say. Almost every little girl in the area has one, and they're each unique, just like the girls who wear them.
The next three or so blog posts will be scheduled while I await the arrival of baby #6. Don't need to be thinking about blogging while I'm nursing and recovering, that's for sure.
Here are just two of the ones I made.
And since they're reversible here's the other side:
A pretty cute and quick gift I'd say. Almost every little girl in the area has one, and they're each unique, just like the girls who wear them.
The next three or so blog posts will be scheduled while I await the arrival of baby #6. Don't need to be thinking about blogging while I'm nursing and recovering, that's for sure.
Monday, June 8, 2015
$1 Hat Rack
My husband and I made these hat racks for my display. We followed these plans from Ana White, but made a couple changes.
First we started off with some scrap wood we had lying around (literally lying around in the backyard). My husband cut the main piece and then the bottom pieces as stated. We attached them like it says but let the main piece touch the floor as well for added support. Since these are originally intended for the outdoor market I need extra support in case it gets windy or someone accidentally yanks on a bag and it falls over. So, we added a base on the bottom to hold a small sand bag I made for even more support.
While the original plans have very adorable wooden hooks that look like branches, I really didn't feel like doing more cutting and painting. I kept my eye open for some sort of hook, or at the very least I was going to drill a hole through the main piece and stick a dowel through. Well, my patience paid off. I found a set of twelve shower hooks for $2at the thrift store! I used six hooks per rack.
They turned out great. Here's the breakdown of cost:
Wood-----------------------Free (scraps)
Primer---------------------Free from the recycling depot
Paint------------------------Free (leftover from my sewing room)
Hooks----------------------$2
Total Cost For Both= $2
Cost Per Hat Rack= $1
Can't really beat that.
First we started off with some scrap wood we had lying around (literally lying around in the backyard). My husband cut the main piece and then the bottom pieces as stated. We attached them like it says but let the main piece touch the floor as well for added support. Since these are originally intended for the outdoor market I need extra support in case it gets windy or someone accidentally yanks on a bag and it falls over. So, we added a base on the bottom to hold a small sand bag I made for even more support.
While the original plans have very adorable wooden hooks that look like branches, I really didn't feel like doing more cutting and painting. I kept my eye open for some sort of hook, or at the very least I was going to drill a hole through the main piece and stick a dowel through. Well, my patience paid off. I found a set of twelve shower hooks for $2at the thrift store! I used six hooks per rack.
They turned out great. Here's the breakdown of cost:
Wood-----------------------Free (scraps)
Primer---------------------Free from the recycling depot
Paint------------------------Free (leftover from my sewing room)
Hooks----------------------$2
Total Cost For Both= $2
Cost Per Hat Rack= $1
Can't really beat that.
Linking up to: My Repurposed Life
Saturday, June 6, 2015
To Market, To Market....
I can officially check one off the bucket list as of yesterday. Yesterday I debuted at my first Farmer's Market. How did it go you ask?
Cue music....womp, womp, wooomp.
Ya, it didn't go so well. It was the opening weekend, well, a Friday to be exact. So due to the fact it was a Friday, kids are in school and it was during working hours, there wasn't much traffic.
The market itself was well run and I loooved the fact that I could pull up, through my stall and set up with my vehicle close by. That was hugely appreciated. It meant I could have a little more room at the back of my tent not only to move around, but to have access to my vehicle meant I could easily store things.
Anyways, on to some pictures and some lessons learned.
Five Things I Learned At My First Farmer's Market
#1. Scout Out Your Market Beforehand
I like knowing what I'm getting into before I jump in. That's just who I am, but this time, I decided to go in blind. Mostly due to the fact that I had my Mother-In-Law visiting and I needed the help. This was the only weekend that she could do it. Anyway, if I had scouted out beforehand I would have realized that this market wasn't right for my stuff. You know you're at the wrong market when it takes you 45 min to set up because you have so much product and display while it takes everyone else 10 min. I guess you could say they were efficient and knew what they were doing.
#2 Don't Debut At An Opening Weekend
I talked to a couple of the vendors and they told me that the first two weekends they suffer, and then things start to pick up. I think it's just because people aren't used to the idea of an outdoor market yet. School is still on, kids sports activities are still going and people's weekends are filled. I think it's usually near the end of June, that weekends start to free up for people and the Market now becomes their "thing" they do. Unless of course the market is always busy no matter what weekend it is.
#3 Be Adaptable
It wasn't until the last two hours that I realized the little traffic that their was, was coming in from one side and the only table that people could see as they passed was the table with the higher priced items. They completely passed by the table at the back that had the lower priced items. When I realized this I moved my bookmarks ($4) to the other table and shuffled things around. I will remember this for next time.
#4 Don't Sell Yourself Short
I felt confident in my prices. I calculated my time and material well. I researched on Etsy and other sources for comparable products. I asked family and friends what they thought. I didn't want to be greedy but I also wanted to be compensated for my time and effort. I took all this into consideration when pricing my items, and was sure that I was charging appropriately. With all this, I only made two real sales (besides family and friends). I would have had to reduce my prices significantly to the point of loss if anyone would buy my products at this market. I didn't want to do that just for the sake of a sale.
#5 Be Prepared For Anything
I thought of everything it seems, "just in case". The questions in my mind before were "what if I sell everything?", "what if I don't sell anything?", "what if it rains?", "Will I have enough bags?" etc. I had a ton of bags it turns out. I realized it would be a good thing if I did sell everything and even if I didn't sell anything I knew just the experience would be worth it. Having thought out many scenarios, I felt at ease. The past few weeks have been a flurry of preparation but I wasn't up late the night before getting anything last minute done. I wanted to be done, with time to spare in case something popped up. I was able to go to bed easy and had a sound sleep because everything was thought of, and done ahead of time.
I had lots of support from family and friends and am very grateful for their help. Thanks to all who attended and those who had such nice things to say.
Cue music....womp, womp, wooomp.
Ya, it didn't go so well. It was the opening weekend, well, a Friday to be exact. So due to the fact it was a Friday, kids are in school and it was during working hours, there wasn't much traffic.
The market itself was well run and I loooved the fact that I could pull up, through my stall and set up with my vehicle close by. That was hugely appreciated. It meant I could have a little more room at the back of my tent not only to move around, but to have access to my vehicle meant I could easily store things.
Anyways, on to some pictures and some lessons learned.
Five Things I Learned At My First Farmer's Market
#1. Scout Out Your Market Beforehand
I like knowing what I'm getting into before I jump in. That's just who I am, but this time, I decided to go in blind. Mostly due to the fact that I had my Mother-In-Law visiting and I needed the help. This was the only weekend that she could do it. Anyway, if I had scouted out beforehand I would have realized that this market wasn't right for my stuff. You know you're at the wrong market when it takes you 45 min to set up because you have so much product and display while it takes everyone else 10 min. I guess you could say they were efficient and knew what they were doing.
#2 Don't Debut At An Opening Weekend
I talked to a couple of the vendors and they told me that the first two weekends they suffer, and then things start to pick up. I think it's just because people aren't used to the idea of an outdoor market yet. School is still on, kids sports activities are still going and people's weekends are filled. I think it's usually near the end of June, that weekends start to free up for people and the Market now becomes their "thing" they do. Unless of course the market is always busy no matter what weekend it is.
#3 Be Adaptable
It wasn't until the last two hours that I realized the little traffic that their was, was coming in from one side and the only table that people could see as they passed was the table with the higher priced items. They completely passed by the table at the back that had the lower priced items. When I realized this I moved my bookmarks ($4) to the other table and shuffled things around. I will remember this for next time.
#4 Don't Sell Yourself Short
I felt confident in my prices. I calculated my time and material well. I researched on Etsy and other sources for comparable products. I asked family and friends what they thought. I didn't want to be greedy but I also wanted to be compensated for my time and effort. I took all this into consideration when pricing my items, and was sure that I was charging appropriately. With all this, I only made two real sales (besides family and friends). I would have had to reduce my prices significantly to the point of loss if anyone would buy my products at this market. I didn't want to do that just for the sake of a sale.
#5 Be Prepared For Anything
I had lots of support from family and friends and am very grateful for their help. Thanks to all who attended and those who had such nice things to say.
Subscribe to:
Posts (Atom)