Wednesday, August 26, 2015

Some Selfish Sewing

Just thought I'd share a couple selfish sewing projects I've needed for awhile now: Pincushions!

I definitely needed one by the sewing machine.  I would always forget to grab my pincushion and was too lazy to get up and grab it.  Then I would just pile the needles beside the machine.  Now that won't happen anymore!


Another project from Sewing to Sell; the boxy pincushion.  The only difference I made to the pattern was make a scrappy rainbow for the top.  I also filled it with crushed walnut shells.  The pinchushions filled with polyfil were always so light.  This one now feels like good quality.  It's so fun to push the pins in (it doesn't take much to make me smile).


Saturday, August 22, 2015

Back to School Sewing

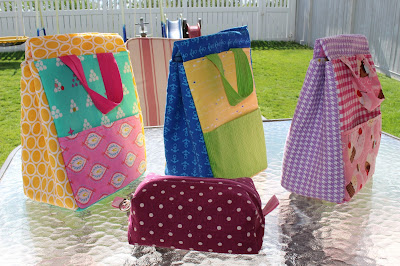
My kids needed some new lunch bags.  The other ones were store bought and pretty icky looking after just one school year.  So I pulled out my copy of Sewing to Sell and made three lunch bags using the pattern from the book.  I let each child choose their own fabric.

Also, my oldest needed a "soft sided" pencil box for school.  I wasn't sure what that meant, so I just made a pencil pouch that was big enough like those hard pencil boxes.


I followed a great tutorial for this pencil pouch found here.


So happy that these are done.  I've wanted the kids to have stylish lunch bags for awhile, but didn't get around to it last year.  Also, when the kids outgrow their clothes and it's not in good enough shape to give away (aka: stained), I salvage the zippers and buttons.  The pencil box has a zipper from an old sweater.  The zipper had a cute pull with a heart in it.  It adds a cute little extra to the pouch I think.


Tuesday, August 18, 2015

Crocheted Rag Rug Finish

 I did it!  I finally finished that crocheted rag rug I've wanted to do for years! I didn't follow a pattern.  I just made a foundation chain as long as I wanted the width and then kind of improvised from there with a pattern of colours I had available. 


Now, I'll be honest, it's not the nicest looking rug.  I just used the colours I had.  Also the edges aren't straight.  That's due to the fact that the fabrics I used were different weights. So even if I had 1" ripped strip, some strips were thicker than others.  This was more of a trial.


At least it fits nicely in my sewing area.


Saturday, August 1, 2015

Car Seat Canopy

We recently acquired a baby bucket car seat from a friend that was getting rid of theirs.  The only thing was, it was missing the canopy.  Not sure what happened to it but I wasn't complaining, it was free!  It still had the plastic brim that holds the canopy up, but it was broken.  It was held together by some duct tape.  For some strange reason I thought, no problem, I'll just make a new canopy.

Well I did just that. 


I don't have any pictures on how I made it but I'll try to explain what I did.
 
My husband suggested we add strength to the plastic brim with some Popsicle sticks and then add more good ol' duct tape.

I first measured the length of the brim and added 1".  Then from the top of the brim I measured down to the back and added 2" to allow room for a casing for the elastic.  I used purple for the brim and cushioned it with some leftover batting. I then sewed the purple to the rest of the fabric that I chose.  I was able to pop off that brim to sew on the fabric.  It was a little awkward with the machine but in the end, persistence prevailed.


There is elastic added to the back to keep things snug but movable.


Because the fabric was one big square, I had to gather the fabric at the sides.  I just tucked it underneath and then sewed that in place.


And that's it.  Even though I had no idea on how to go about making this, I am thankful it turned out well. 


Related Posts Plugin for WordPress, Blogger...